
Rust-OS Kernel - To userspace and back!
This post documents my attempts to manage to jump (or return?) from kernel-space to usermode in my Rust kernel so that it can do what a kernel is supposed to actually do: give the CPU to user programs. That’s pretty exciting! In the next part, we’ll even take control back from the programs so that we can implement a scheduler.
Source code: https://github.com/nikofil/rust-os
What the hell is a usermode?
When we are running a program in usermode in a real kernel, life is pretty easy: We don’t need to worry about crashing the entire system, we can pretend the entire virtual memory space belongs to us and we don’t need to care about the GDT and segments. If we need to interact with the rest of the world, we can simply perform a syscall to the kernel to do it for us as we are powerless to do so.
That’s because in usermode a program is limited to only doing processing of data. It can’t communicate with devices, access important registers (ie. Control Registers, such as cr3 used to set up paging tables) or read memory that is on a higher access level. It has to ask the kernel for even the simplest task, such as reading or writing a single character from/to the input/screen. Without doing that, no usermode program could ever have inputs or outputs of any kind.
The kernel has to do all the heavy lifting: It has to set up the environment just perfect for the user program to have all of its information where it expects in order to be able to run. Then, when the user program performs a syscall, it has to make sure to save all of its registers and stack location to be able to restore it later so that a syscall behaves just like a regular call from the program’s perspective, while in reality it’s a much more complex process.
Whenever the kernel wants to give execution to a user program, the process can be summarized into 3 steps:
- Enable the page table that has this program’s memory mapped to the correct virtual addresses (as each program might be using the same virtual address, but different physical memory underneath)
- Set the
csanddsregisters to the proper indexes in the GDT to indicate that we’re currently in Ring3 (usermode) - Set all the appropriate registers and perform an
iretq(orsysretqif returning from a syscall)
On the other hand, calling the kernel from usermode is simply a matter of setting the registers to the desired syscall number and parameters and performing a syscall instruction, upon which the kernel has to handle the messy part again.
Let’s look at each one of these steps.
Enabling the page table for the user process
The page table is a structure that allows the kernel to use virtual paging. That means that, when the processor is in long mode the memory addresses almost never correspond to the physical memory address that is used. Instead, the page table is used to lookup which physical page a virtual page corresponds to whenever we store to or load from an address, except for a few special operations. One of these special operations is, of course, setting the register that determines where the page table is: cr3. This register must know the physical location of the (topmost) page table, as otherwise it would have to use itself to resolve the physical location which would be even more confusing!
Creating a new page table
This subject goes quite deeper, with nested page tables and permissions, but I won’t go that deep into that here.
Okay, so our first task is to create a page table for our new user process. We still want to keep the kernel mapped where it’s already loaded, as otherwise the next instruction after loading the page table would (probably) not be there and we would crash. So first order of business is to copy the kernel’s PT entries over to a new one:
impl PageTable {
    pub unsafe fn new() -> Box<PageTable> {
        let mut pt = Box::new(PageTable{ entries: [PTEntry(0); 512] }); // allocate the master PT struct
        pt.entries[0].set_phys_addr(Self::alloc_page()); // allocate page for the first child PT
        pt.entries[0].set_bit(BIT_PRESENT, true);
        pt.entries[0].set_bit(BIT_WRITABLE, true);
        pt.entries[0].set_bit(BIT_USER, true); // entry is present, writable and accessible by user
        let mut pt0 = pt.entries[0].next_pt(); // get the child PT we just allocated
        let cur_pt0 = get_page_table().entries[0].next_pt();
        pt0.entries[3] = cur_pt0.entries[3].clone(); // copy over the entries 3, 4, 5, 6 from the equivalent
        pt0.entries[4] = cur_pt0.entries[4].clone(); // child PT that is currently in use
        pt0.entries[5] = cur_pt0.entries[5].clone(); // these correspond to the addresses our kernel uses
        pt0.entries[6] = cur_pt0.entries[6].clone(); // plus some more, so that the entire physical memory is mapped
        pt
    }
}
What this code does is that it creates a new page table structure which maps the virtual addresses 0xC0000000 to 0x1C0000000 to the same physical memory that the kernel’s page table maps these addresses to. This is exactly 4GiB that the kernel uses not only for its own code, but to also have the entire memory mapped. This means the kernel (and only the kernel) can access physical address x by accessing virtual address 0xC0000000 + x which makes the transition pretty easy. The kernel itself is located pretty early in that memory.
We also allow the page table to be user accessible and writable. This doesn’t mean that necessarily all the virtual addresses that it maps will be writable and user-accessible, as each entry in the page table at this level points to another page table. In these other page tables then we can restrict the write or user-accessible bits as needed.
Great, so we allocated the topmost page table and we have a pointer to it! What do we do with this thing?
We still have to map the virtual memory for the program’s code and stack to physical memory. But first we have to know the physical address where our program begins, in order to be able to map a virtual address to it!
The usermode program
For simplicity’s (ha) sake, my current usermode program is simply another Rust function. It doesn’t have anything to do for now:
pub unsafe fn userspace_prog_1() {
    asm!("\
        nop
        nop
        nop
    ":::: "intel");
}
Mapping the program and the stack to virtual memory
We now have to determine its physical address, and where the physical page that contains it is located (as page tables deal in units of, well, pages). Then we map that page to 0x400000 which is a pretty common place for a program’s entry point (or at least it was in the 32-bit days). It was the first address you used to see when debugging a new program!
let userspace_fn_1_in_kernel = mem::VirtAddr::new(userspace::userspace_prog_1 as *const () as u64);
let userspace_fn_phys = userspace_fn_1_in_kernel.to_phys().unwrap().0; // virtual address to physical
let page_phys_start = (userspace_fn_phys.addr() >> 12) << 12; // zero out page offset to get which page we should map
let fn_page_offset = userspace_fn_phys.addr() - page_phys_start; // offset of function from page start
let userspace_fn_virt_base = 0x400000; // target virtual address of page
let userspace_fn_virt = userspace_fn_virt_base + fn_page_offset; // target virtual address of function
serial_println!("Mapping {:x} to {:x}", page_phys_start, userspace_fn_virt_base);
let mut task_pt = mem::PageTable::new(); // copy over the kernel's page tables
task_pt.map_virt_to_phys(
    mem::VirtAddr::new(userspace_fn_virt_base),
    mem::PhysAddr::new(page_phys_start),
    mem::BIT_PRESENT | mem::BIT_USER); // map the program's code
task_pt.map_virt_to_phys(
    mem::VirtAddr::new(userspace_fn_virt_base).offset(0x1000),
    mem::PhysAddr::new(page_phys_start).offset(0x1000),
    mem::BIT_PRESENT | mem::BIT_USER); // also map another page to be sure we got the entire function in
let mut stack_space: Vec<u8> = Vec::with_capacity(0x1000); // allocate some memory to use for the stack
let stack_space_phys = mem::VirtAddr::new(stack_space.as_mut_ptr() as *const u8 as u64).to_phys().unwrap().0;
// take physical address of stack
task_pt.map_virt_to_phys(
    mem::VirtAddr::new(0x800000),
    stack_space_phys,
    mem::BIT_PRESENT | mem::BIT_WRITABLE | mem::BIT_USER); // map the stack memory to 0x800000
We can now enable this page table! That’s simply a matter of calling task_pt.enable() which does the following:
pub unsafe fn enable(&self) {
    let phys_addr = self.phys_addr().addr();
    asm!("mov $0, %cr3" :: "{rax}"(phys_addr) :: "volatile");
}
cr3 is now set. The virtual memory above 0xC0000000 will be exactly the same, but there’s now memory mapped to 0x400000 and 0x800000!
Setting the GDT entries and MSR registers
The way segment registers (cs, ds, ss etc.) work in protected and long mode is that they are set to an index in the structure called the Global Descriptor Table (GDT) which contains entries for each memory segment we might want to use. These registers were used to solve the problem of accessing different memory regions by early x86 processors before paging was a thing. The way it worked was roughly that each segment started at a specified physical memory address, so instead of using a page table and a virtual address to access the memory you wanted you would use a segment for the base of the so-called linear address and an offset to access the specific value that you wanted. This underwent some changes with the introduction of protected mode which allowed processors to use paging. Nowadays processors are backwards compatible and usually when booting go through real and protected mode before entering 64-bit long mode, which allows us to use (currently) 48 bits for addressing. This is a lot more than the 16 bits segment base plus 16 bits offset that we could use in the segmentation days: using 48 bits we can address up to 256 TiB of memory. Segments are therefore mostly obsolete nowadays. In fact, most of the segment bases are ignored and are forced to be 0 (besides fs and gs which can have nonzero base addresses).
Why do we care about them, then? That’s because segments also define the current privilege level that the processor is in. These privilege levels are also called rings, as each ring has all the privileges of the rings below it so if you visualize it, ring 0 would contain ring 1, which would contain ring 2 etc. Usually only two rings are used: Ring 0 for the kernel and ring 3 for user-space programs. In ring 0 the processor can interact with physical hardware using special instructions, as well as do things like change the loaded page table which would be disastrous if any user-space program could do.
For each instruction, there are 3 privilege levels we must consider to know if it will throw a General Protection Fault:
- The CPL is the current level and is defined by the last 2 bits of the
csregister (so it can take values of 0 to 3) - The DPL is the descriptor level. It is the minimum CPL that is allowed to access that segment and is stored in the GDT entry that each segment register points to. If
DPL > CPLand the memory segment defined by that entry is attempted to be accessed, you get a GPF! - The RPL is the requested level and is defined by the last 2 bits of other segment registers. It works the same way that the DPL does but is stored in the register instead of the entry that it points to. I believe that it’s obsolete as it does the same job as the DPL but is kept around for backwards compatibility. Again, RPL > CPL causes a GPF!
Creating the new GDT entries
If you’ve followed the tutorial at https://os.phil-opp.com/double-fault-exceptions/ you should already have a working GDT structure. We’ll now have to modify that, in order to include entries for both kernel and user-mode segments. Also, for reasons that I’ll explain soon, these entries have to be in a very particular order. This is the way my GDT looks:
lazy_static! {
    static ref GDT: (GlobalDescriptorTable, [SegmentSelector; 5]) = {
        let mut gdt = GlobalDescriptorTable::new();
        let kernel_data_flags = DescriptorFlags::USER_SEGMENT | DescriptorFlags::PRESENT | DescriptorFlags::WRITABLE;
        let code_sel = gdt.add_entry(Descriptor::kernel_code_segment()); // kernel code segment
        let data_sel = gdt.add_entry(Descriptor::UserSegment(kernel_data_flags.bits())); // kernel data segment
        let tss_sel = gdt.add_entry(Descriptor::tss_segment(&TSS)); // task state segment
        let user_data_sel = gdt.add_entry(Descriptor::user_data_segment()); // user data segment
        let user_code_sel = gdt.add_entry(Descriptor::user_code_segment()); // user code segment
        (gdt, [code_sel, data_sel, tss_sel, user_data_sel, user_code_sel])
    };
}

pub fn init_gdt() {
    GDT.0.load();
    let stack = unsafe { &STACK as *const _ };
    let user_stack = unsafe { &PRIV_TSS_STACK as *const _ };
    println!(
        " - Loaded GDT: {:p} TSS: {:p} Stack {:p} User stack: {:p} CS segment: {} TSS segment: {}",
        &GDT.0 as *const _, &*TSS as *const _, stack, user_stack, GDT.1[0].0, GDT.1[1].0
    );
    unsafe {
        set_cs(GDT.1[0]);
        load_ds(GDT.1[1]);
        load_tss(GDT.1[2]);
    }
}
We see that the kernel-mode segment registers are loaded upon initialization of the kernel! In a similar fashion, we will be setting the user-mode ones before jumping to user-mode for the first time to restrict the user program’s permissions. How do we restore the kernel-mode ones afterwards, though?
Setting the IA32_STAR model-specific register
Finally, the last piece of the puzzle: Once we are in user-mode and we want to make a syscall we need a way to restore our old segment registers so that we have full permissions again. Obviously this is not something the user program can do, and a special mechanism is once again needed. As I want to use the modern syscall / sysret instructions to interface with the kernel, there are some model-specific register (MSRs) that need to be defined. The first of these is called IA32_STAR and its purpose is exactly what we want: Upon a syscall, cs and ss are restored by using the value stored in that register. Specifically, the following happens upon executing the syscall instruction, among other things:
CS.Selector ← IA32_STAR[47:32] AND FFFCH (* Operating system provides CS; RPL forced to 0 *)
SS.Selector ← IA32_STAR[47:32] + 8;
Side note: Thanks to https://www.felixcloutier.com/x86/ for providing these invaluable details for each instruction!
In a similar manner, the following happens upon returning from a syscall, using the sysret instruction:
CS.Selector ← IA32_STAR[63:48]+16;
SS.Selector ← (IA32_STAR[63:48]+8) OR 3;
The spec of these two instructions therefore doesn’t give us too much wiggle room. We have to setup IA32_STAR so that bits 32:47 contain the index of the kernel-mode code segment entry in the GDT, and the user-mode stack segment entry (for which we’ll use the data entry, as it makes no difference) has to be right after that. Similarly bits 48:63 will contain the index of the user-mode code segment entry in the GDT, after which will be the index of the user-mode data segment entry. That’s a mouthful, so let’s get to it and forget about this part forever afterwards!
Each entry in the GDT is normally 8 bytes, however the TSS one is special and takes up two entries, being 16 bytes. Also the first entry has to be empty, so we don’t consider it. This is what our GDT looks like:
| Offset | Entry | IA32_STAR bits |
|---|---|---|
| +0 | Empty | |
| +8 | Kernel code | 32:47 |
| +16 | Kernel data | |
| +24 | TSS pt1 | |
| +32 | TSS pt2 | 48:63 |
| +40 | User data | |
| +48 | User code |
This way, the upon syscall/sysret the segment registers will point to the entries we want! For syscall we want IA32_STAR[32:47] == 8 The sysret one in particular is rather confusing: Notice that it has nothing to do with the TSS register. What we want is for IA32_STAR[48:63] + 8 == user SS and IA32_STAR[48:63] + 16 == user CS which we get by putting the offset 32 (=0x20) in that position in the register. Notice that the last 2 bits of the segment selector however need to be 3 here to indicate that we are in ring 3, so we finally use the value 0x23 for that position in the register.
All in all, we want the register to have the value 0x23000800000000. We set that register with the instruction wrmsr (write model-specific register). The higher bits are set to the value of rdx and the lower (which should be zero) to the value of rax while rcx determines which MSR we write to (IA32_STAR is 0xC0000081). The following code does what we want:
// register for address of syscall handler
const MSR_STAR: usize = 0xC0000081;

pub unsafe fn init_syscalls() {
    // write segments to use on syscall/sysret to AMD'S MSR_STAR register
    asm!("\
    xor rax, rax
    mov rdx, 0x230008 // use seg selectors 8, 16 for syscall and 43, 51 for sysret
    wrmsr" :: "{rcx}"(MSR_STAR) : "rax", "rdx" : "intel", "volatile");
}
System Call Extensions
Finally we have to enable System Call Extensions (SCE) to be able to use the syscall/sysret opcodes by setting the last bit in the MSR IA32_EFER. The following code which I’ve put in the boot sequence does that:
mov ecx, 0xC0000080
rdmsr
or eax, 1
wrmsr
We’re finally done with the GDT part. Phew!
iretq’ing ourselves to usermode
We’re now pretty much ready to make our first jump to lightspeed usermode! All we need is to set a couple segment registers, a couple non-segment registers and off we go.
Setting the segment selectors
First, I’ve put this method in
#[inline(always)]
pub unsafe fn set_usermode_segs() -> (u16, u16) {
    // set ds and tss, return cs and ds
    let (mut cs, mut ds) = (GDT.1[4], GDT.1[3]);
    cs.0 |= PrivilegeLevel::Ring3 as u16;
    ds.0 |= PrivilegeLevel::Ring3 as u16;
    load_ds(ds);
    (cs.0, ds.0)
}
This sets the data segment to our previously defined user data segment selector, OR’d with 3 to indicate the RPL for this entry is usermode. Then we return the OR’d segment selector for the code and stack segments (which will be the same as the data segment). That’s because we can’t set them right now, otherwise we couldn’t execute the rest of this method as it’s located in kernel land. Instead, the fabled iretq instruction will set these segment selectors for us, along with several other things.
iretq specification
Here’s the spec for the iretq instruction: https://www.felixcloutier.com/x86/iret:iretd
We care about the (huge, for a single instruction) operation. Let’s go through the path that we’re going to follow, a piece at a time.
IF PE = 0 # false, Physical Address Extension (64-bit mode) has been enabled early in the boot process
ELSIF (IA32_EFER.LMA = 0) # false, we also activated Long Mode early
ELSE GOTO IA-32e-MODE;
IA-32e-MODE:
IF NT = 1 # NT bit in FLAGS register is clear
ELSE IF OperandSize = 32 # the q in iretq means our OperandSize = 64
ELSE (* OperandSize = 64 *)
    RIP ← Pop(); # so, we need to push the address to jump to (rip)
    CS ← Pop(); #  and we need to push the next cs to use
    tempRFLAGS ← Pop(); # and the next rflags
FI;
IF CS.RPL > CPL # indeed, we go to a higher privilege level
    THEN GOTO RETURN-TO-OUTER-PRIVILEGE-LEVEL;
RETURN-TO-OUTER-PRIVILEGE-LEVEL:
IF OperandSize = 32 # nope, it's 64
ELSE IF OperandSize = 16 # nope
ELSE (* OperandSize = 64 *) # that's the one
    RSP ← Pop(); # and we need to push the next rsp
    SS ← Pop(); # and the next ss
FI;
The rest of the operation is not that interesting, except for:
CPL ← CS(RPL); our new CPL is the RPL of our new cs! That means we are now in usermode.
Final code to return to usermode
Let’s set this all up, then. We need to push the required registers in the reverse order that they get popped.
This is the code that does all the things we just talked about:
pub unsafe fn jmp_to_usermode(code: mem::VirtAddr, stack_end: mem::VirtAddr) {
    let (cs_idx, ds_idx) = gdt::set_usermode_segs();
    x86_64::instructions::tlb::flush_all(); // flush the TLB after address-space switch
    asm!("\
    push rax   // stack segment
    push rsi   // rsp
    push 0x200 // rflags (only interrupt bit set)
    push rdx   // code segment
    push rdi   // ret to virtual addr
    iretq"
    :: "{rdi}"(code.addr()), "{rsi}"(stack_end.addr()), "{dx}"(cs_idx), "{ax}"(ds_idx) :: "intel", "volatile");
}
Finally we can call that function with the desired rip and rsp, which should be the virtual addresses that we set up before:
jmp_to_usermode(mem::VirtAddr::new(userspace_fn_virt), mem::VirtAddr::new(0x801000));
Seeing the return in GDB
Let’s see it happen in action! We can attach a debugger to our OS by running qemu with the -s -S options, which makes the processor start paused and opens a tcp server on port 1234. Another helpful one is -monitor stdio, which gives us a console that we can use to query the processor’s state (ie. registers, CPL). Let’s do that and attach gdb with:
>>> target remote localhost:1234
This is the screen that greets me:
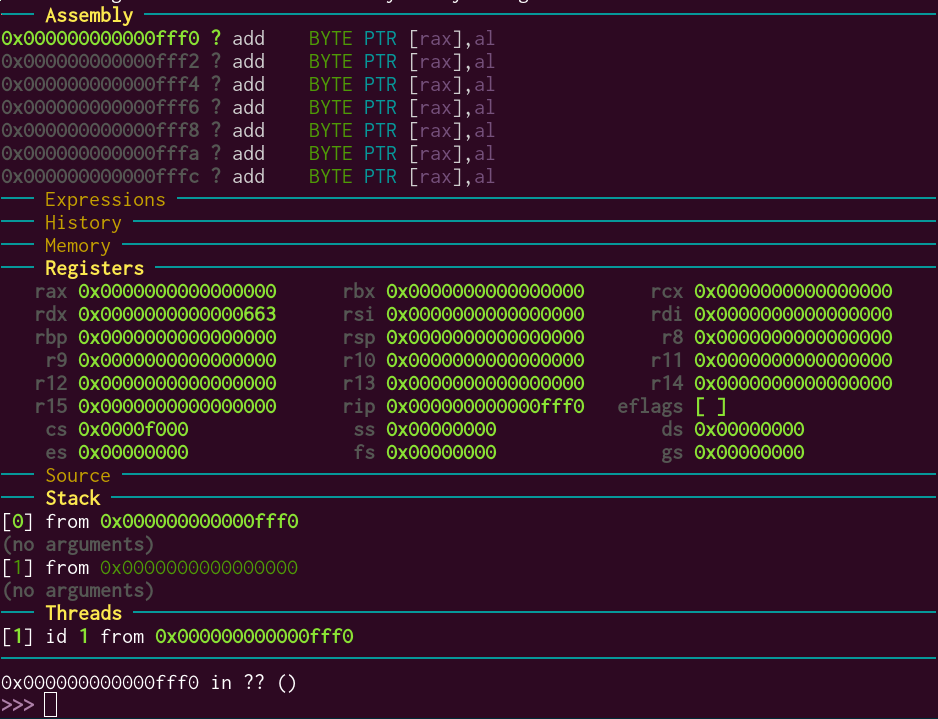
I can now set a breakpoint on jmp_to_usermode so that I can see the processor switching to usermode:
>>> file /home/nikos/workspace/rust-os/target/kernel-x86_64.bin
Reading symbols from /home/nikos/workspace/rust-os/target/kernel-x86_64.bin...(no debugging symbols found)...done.
>>> b jmp_to_usermode
Breakpoint 1 at 0xc0181cd0
>>> c
We step a bit further, until the iretq instruction:
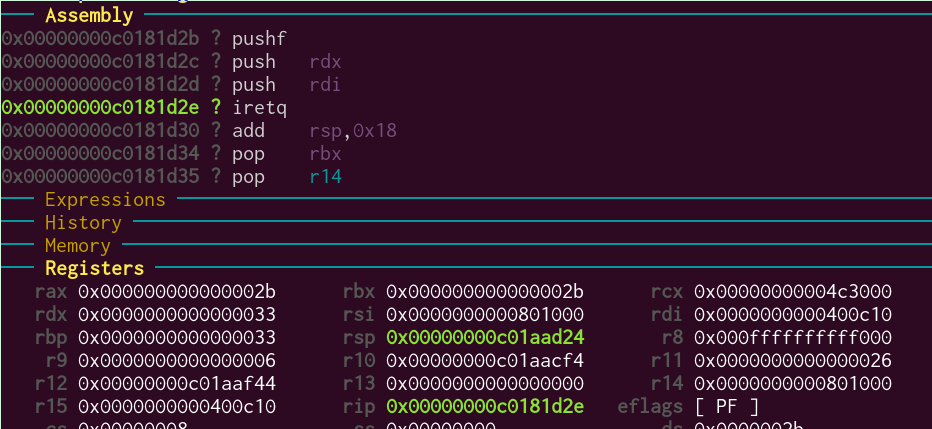
One more step, and…
Seems to have worked! You can see the registers and segment selectors are what we expect. One more step confirms that we can actually execute instructions while in usermode and that we don’t get a GPF.
The qemu console also confirms that we’re now in CPL 3:

All that remains now is to go back to the kernel.
syscall and sysret
There are several ways for the kernel to take control once a user program is running in x86. The one that was initially used in Unix-like kernels was to trigger a trap: essentially, to make the program raise an exception which the kernel has to handle. For example, a kernel could similarly use a divison by zero to call the kernel (though that’s a bad idea).
Typically a trap was triggered with an int 80h instruction. The kernel would then be summoned, and the entry defined at index 80h in the Interrupt Descriptor Table would be used to handle the exception. That would typically be the system call handler which would then use the registers passed to determine which syscall is requested.
The issue with this is that, well, exceptions are slow. They have unnecessary overhead. The processor must read the IDT, make access control checks etc. everytime that we do this. To avoid this, Intel developed the sysenter/sysexit pair of instructions. At the same time AMD developed syscall/sysret. In 32-bit kernels sysenter/sysexit is compatible with both Intel and AMD processors. In 64-bits however, it’s syscall/sysret that is compatible.
syscall/sysret simplify the system call procedure. These instructions can take fewer than 1/4th of clock cycles of a regular call/ret. Part of the reason is that the processor has dedicated registers for which address to jump to and what to set the important segment registers to. The latter we’ve already defined: It’s the IA32_STAR MSR that we set a while ago! We still need to define two more similar MSRs and then we’re ready to go.
IA32_LSTAR and IA32_FMASK
These are the two additional registers we need to set. Thankfully they’re pretty straightforward: IA32_LSTAR is the most important one, the address of our syscall handler that will be called on every syscall instruction. IA32_FMASK gives us a way to mask out some bits from the RFLAGS register when a syscall occurs.
-
For the latter, we want to only clear the interrupt flag in
RFLAGS. This way, once a syscall is triggered, we ignore any other interrupts: timer, keyboard etc. at least until we can set up a stack for the syscall. Notice that the start of a syscall is a bit confusing: We are still using the user program’s stack until we can set up a kernel-side one, but we’re running in kernel mode. That’s why a hardware exception occuring right there would possibly result in weird situations.Therefore, we want to clear bit 9 (Interrupt Flag). The value for
IA32_FMASKwill be1 << 9 = 0x200. -
The former is straightforward enough: we have to create the syscall handler and write the address to it. Let’s just make it an empty method for now. All in all, this is our updated
init_syscallsmethod:
// register for address of syscall handler
const MSR_STAR: usize = 0xc0000081;
const MSR_LSTAR: usize = 0xc0000082;
const MSR_FMASK: usize = 0xc0000084;

pub unsafe fn init_syscalls() {
    let handler_addr = handle_syscall as *const () as u64;
    // clear Interrupt flag on syscall with AMD's MSR_FSTAR register
    asm!("\
    xor rdx, rdx
    mov rax, 0x200
    wrmsr" :: "{rcx}"(MSR_FMASK) : "rdx" : "intel", "volatile");
    // write handler address to AMD's MSR_LSTAR register
    asm!("\
    mov rdx, rax
    shr rdx, 32
    wrmsr" :: "{rax}"(handler_addr), "{rcx}"(MSR_LSTAR) : "rdx" : "intel", "volatile");
    // write segments to use on syscall/sysret to AMD'S MSR_STAR register
    asm!("\
    xor rax, rax
    mov rdx, 0x230008 // use seg selectors 8, 16 for syscall and 43, 51 for sysret
    wrmsr" :: "{rcx}"(MSR_STAR) : "rax", "rdx" : "intel", "volatile");
}

#[naked]
fn handle_syscall() {
    unsafe {
        asm!("\
        nop
        nop
        nop
        sysretq
        ":::: "intel");
    }
}
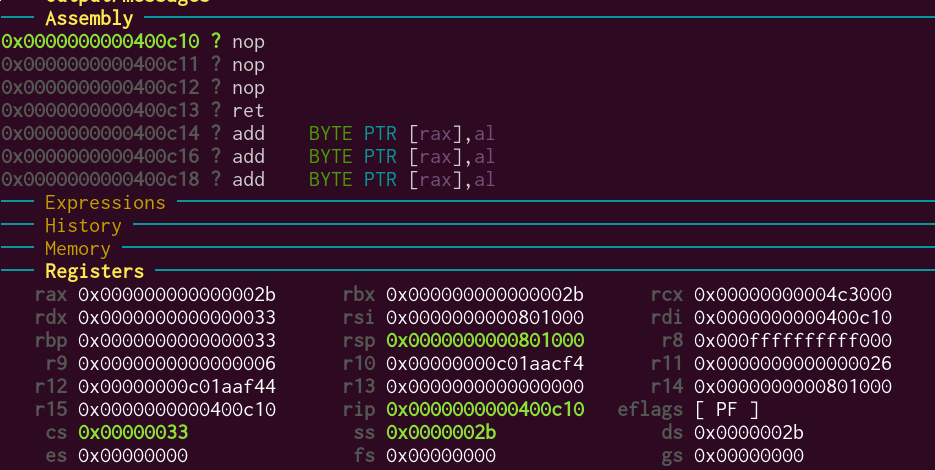
This should now work! Let’s test it. I change my user process to perform a syscall, and track it in gdb.
Before the syscall:
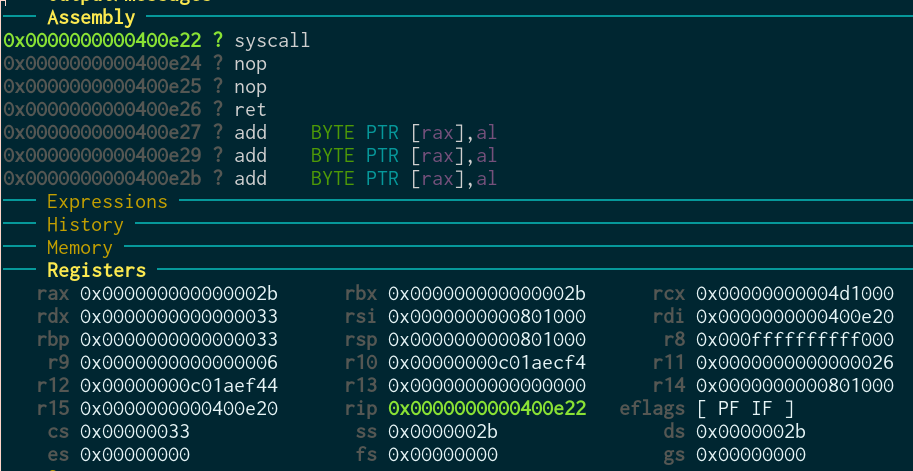
Inside the syscall:
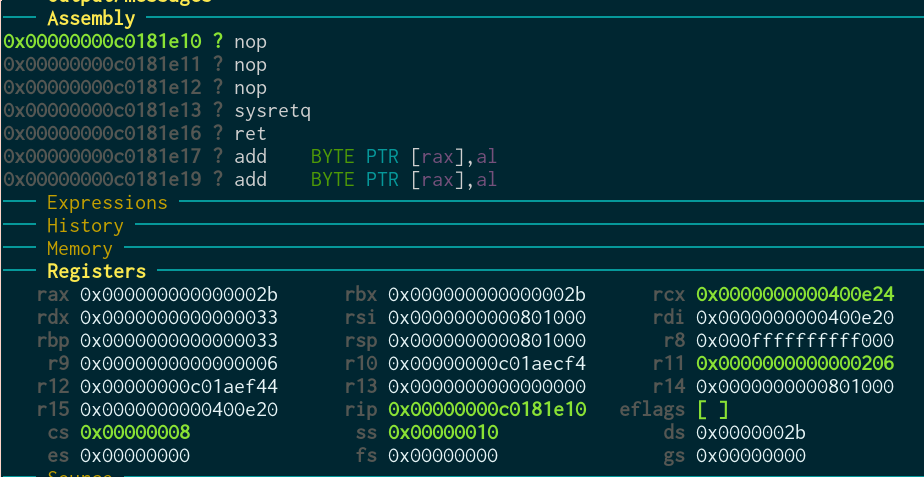
After sysret:
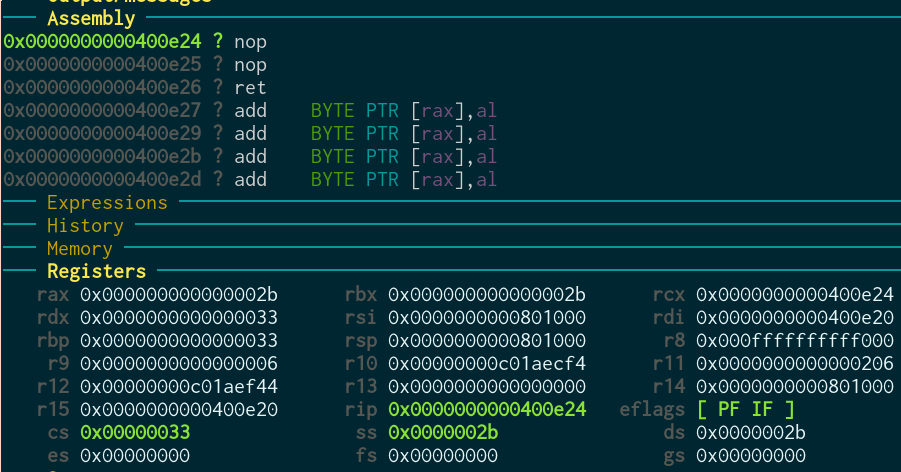
Perfect! You can see we go to kernel mode (cs=8) again, and then back (cs=0x33)! Everything works as we want it, finally.
This syscall was not particularly useful. We can’t do all the useful things we have in mind directly, however! That’s because the code that Rust will emit will probably overwrite the usermode program’s registers, but we have to maintain the ones that the program doesn’t expect to change. Also, while we could use the program’s stack, that means that the program will then be able to see data that our kernel created in its stack. Exposing the internals of our kernel to a user program is a bad idea! Let’s see what we can do about this.
Saving the registers & stack
I won’t get into calling conventions too much, but the idea is this: When a call is performed, the caller function expects some specific registers to be the same when the called function returns. For the rest of them, the caller function expects they will be erased and needs to save them somewhere is it wants to keep them. These registers are called callee-saved and caller-saved respectively. You can read about the calling convention used in Unix-like kernels (and the one we will use) at https://en.wikipedia.org/wiki/X86_calling_conventions#System_V_AMD64_ABI. Syscalls work the same as that: Only rbp, rbx and r12-15 are callee-saved so we only need to save these and we can use the rest as we want. The following file in the Linux kernel also gives a nice overview: https://github.com/torvalds/linux/blob/v3.13/arch/x86/kernel/entry_64.S#L569-L591
There is however a slight catch: The syscall instruction also saves the caller’s rip into rcx and rflags into r11. For the sysret instruction to work properly we need these to be unaltered from the start of our syscall handler. Therefore we’ll also save these in the stack.
Let’s add these things to our syscall handler. Essentially, we’re doing the compiler’s job and adding the function prologue and epilogue by hand, after telling the compiler to skip the standard ones with the #[naked] attribute.
#[naked]
fn handle_syscall() {
    unsafe { asm!("\
        push rcx // backup registers for sysretq
        push r11
        push rbp
        push rbx // save callee-saved registers
        push r12
        push r13
        push r14
        push r15"
        :::: "intel", "volatile"); }
    unsafe { asm!("\
        pop r15 // restore callee-saved registers
        pop r14
        pop r13
        pop r12
        pop rbx
        pop rbp // restore stack and registers for sysretq
        pop r11
        pop rcx
        sysretq // back to userland"
        :::: "intel", "volatile"); }
}
Afterwards, as we said, we want to move out of the user program’s stack into a new, disposable one so that we don’t leak kernel information into that stack. Where will we find the disposable one? We can just allocate some space! Then we’ll move the pointer to that space into rsp, after which we can actually do some useful work in the syscall.
Another small catch here: We want to maintain the parameters that the user program called the syscall with before calling the allocator. They are still in the registers that were passed to us: rdi, rsi, rdx and r10 (other kernels might use additional, but 4 params are enough for mine). Also importantly rax stores the syscall number to be called and will be used to differentiate between the different syscalls in the future. The compiler doesn’t know about this, so we have to do it ourselves. This is the “caller-saved” part we talked about before: We save our registers because the called function might erase them. The code will be similar to the previous piece of code.
unsafe { asm!("\
    mov rbp, rsp // save rsp
    sub rsp, 0x400 // make some room in the stack
    push rax // backup syscall params while we get some stack space
    push rdi
    push rsi
    push rdx
    push r10"
    :::: "intel", "volatile"); }
let syscall_stack: Vec<u8> = Vec::with_capacity(0x1000);
let stack_ptr = syscall_stack.as_ptr();
unsafe { asm!("\
    pop r10 // restore syscall params to their registers
    pop rdx
    pop rsi
    pop rdi
    pop rax
    mov rsp, rbx // move our stack to the newly allocated one
    sti // enable interrupts"
    :: "{rbx}"(stack_ptr) : "rbx" : "intel", "volatile"); }
Our new stack is finally ready! We can now move out the parameters into variables in Rust so that we can do some useful work (which for now will just be printing our params). When we don’t need the stack anymore, we can drop the vector. This way Rust will know when it can drop it - otherwise it might consider it useless and drop it early, or try to drop it late after we’ve moved rsp back to its original position. Both would probably cause us to crash.
Here’s the final code of the syscall handler, where we finally get back to kernel mode and then back again!
#[naked]
fn handle_syscall() {
    unsafe { asm!("\
        push rcx // backup registers for sysretq
        push r11
        push rbp // save callee-saved registers
        push rbx
        push r12
        push r13
        push r14
        push r15
        mov rbp, rsp // save rsp
        sub rsp, 0x400 // make some room in the stack
        push rax // backup syscall params while we get some stack space
        push rdi
        push rsi
        push rdx
        push r10"
        :::: "intel", "volatile"); }
    let syscall_stack: Vec<u8> = Vec::with_capacity(0x1000);
    let stack_ptr = syscall_stack.as_ptr();
    unsafe { asm!("\
        pop r10 // restore syscall params to their registers
        pop rdx
        pop rsi
        pop rdi
        pop rax
        mov rsp, rbx // move our stack to the newly allocated one
        sti // enable interrupts"
        :: "{rbx}"(stack_ptr) : "rbx" : "intel", "volatile"); }
    let syscall: u64;
    let arg0: u64;
    let arg1: u64;
    let arg2: u64;
    let arg3: u64;
    unsafe {
        // move the syscall arguments from registers to variables
        asm!("nop"
        :"={rax}"(syscall), "={rdi}"(arg0), "={rsi}"(arg1), "={rdx}"(arg2), "={r10}"(arg3) ::: "intel", "volatile");
    }
    println!("syscall {:x} {} {} {} {}", syscall, arg0, arg1, arg2, arg3);
    let retval: i64 = 0; // placeholder for the syscall's return value which we need to save and then return in rax
    unsafe { asm!("\
        mov rbx, $0 // save return value into rbx so that it's maintained through free
        cli" // disable interrupts while restoring the stack
        :: "r"(retval) :: "intel", "volatile");
    }
    drop(syscall_stack); // we can now drop the syscall temp stack
    unsafe { asm!("\
        mov rax, rbx // restore syscall return value from rbx to rax
        mov rsp, rbp // restore rsp from rbp
        pop r15 // restore callee-saved registers
        pop r14
        pop r13
        pop r12
        pop rbx
        pop rbp // restore stack and registers for sysretq
        pop r11
        pop rcx
        sysretq // back to userland"
        :::: "intel", "volatile"); }
}
Calling our syscall
We can test our syscall with a simple user program that calls it repeatedly:
pub unsafe fn userspace_prog_1() {
    asm!("\
        start:
        mov rax, 0xCA11
        mov rdi, 10
        mov rsi, 20
        mov rdx, 30
        mov r10, 40
        syscall
        jmp start
    ":::: "volatile", "intel");
}
And this is the result that we get:
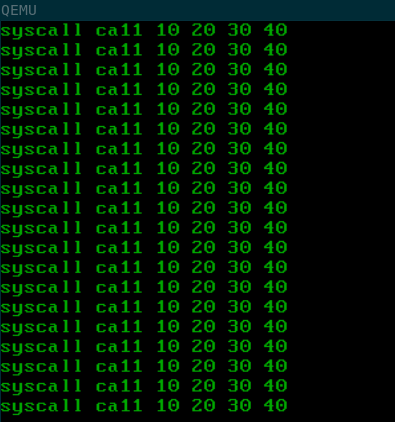
Finally, everything works as it should! Our syscall works and we can add additional functionalities, depending on the syscall number, such as writing a string to the screen or opening a file. That’s something to do in the future, though. For now we accomplished what we set out to do.
In the next part, we’re going to do scheduling, so that we can run multiple processes at once.
Comments